
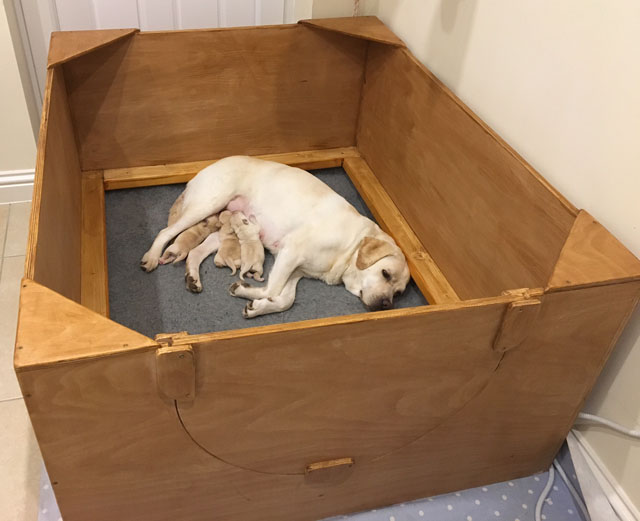
2017-03-23
Found your plans and photos on the web and though they were fantastic and just perfect for our pale cream Labrador. Just had our very first litter, but feel we will probably only do one more, so just screwed it together, rather than using your tee nuts. The whelping bar is brilliant and it is very sturdy. I went for a semi-circular entrance door which just slots in and is so easy to a) make and b) use.
Gemma, our Labrador now loves it, with her 7 puppies.
Harry
Buckingham, England

2016-09-14
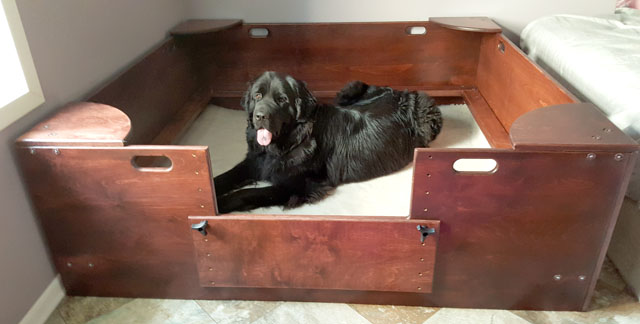
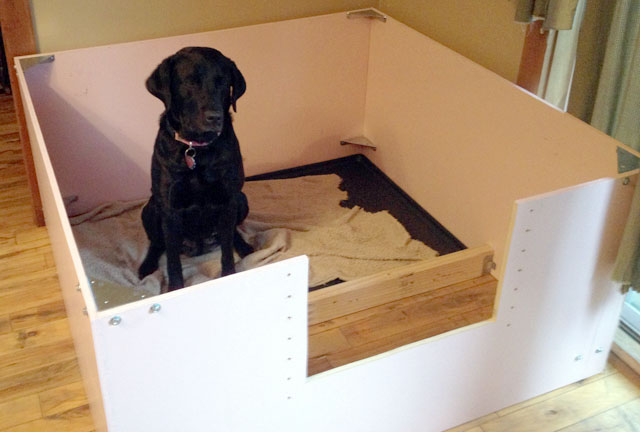
Hello! We have had 2 litters with our Great Danes, and made 2 different whelping boxes. Both from the plans on your website. With the second box, I decided to make it much nicer.
We found out our female was pregnant about 10 days before she gave birth. We were not sure when she got pregnant since we were out of town. Had the walls up, but no pig rails nor seats yet. Wanted her to get comfortable in the new box as soon as possible, so I stayed up until 1:30am. Figured we had at least 3 more days. Well, The first puppy came at 7am the next day! She only had 4 puppies this time.
I wanted a different door this time. Took ideas from different designs and came up with the door I have now.
Thanks!
Vic Harrison
South Fork Danes
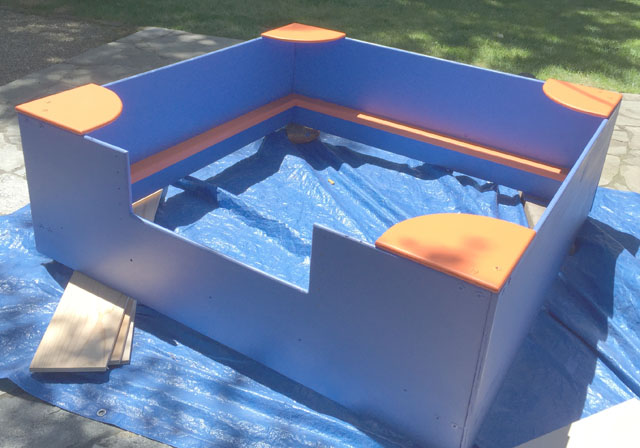
2016-08-06
Thank you so much for posting your whelp box plans. I saw a photo someone else had made using them on a forum and we used it to build a 5'x 5' x 20" whelp box for newfoundlands.
My father-in-law built it using two 5'x5' pieces of 3/4" baltic birch and ended up gluing two layers of scrap together to make the pig rails (it makes it extremely easy to rabbet each end of the rails as he just cuts midway through the glued piece and used a filling/putty knife to split the pieces off).
We absolutely love the design, especially the corner pieces so you can sit along the edges. One of our newfs is due to whelp a large litter in 10 days so we are very excited to use it!
All in all it cost us $296 in supplies to make (in Canada) which is cheaper than the $400+ for the corrugated plastic whelp boxes you can buy, and it looks MUCH better and is sturdier, too.
Thanks again,
Ashley
Winnipeg, MB


2015-05-28
Thank you for providing access to your free plans for a whelping box. We built one pretty close to your design and I now have 12 lab/golden puppies enjoying it. I am a breeder/caretaker for Canine Companions for Independence (www.CCI.org). This organization raises and trains service dogs for persons with disabilities.
I have included a few pics here.
Thanks Again
Brenda Epperly
Napa Valley, Ca


2015-04-21
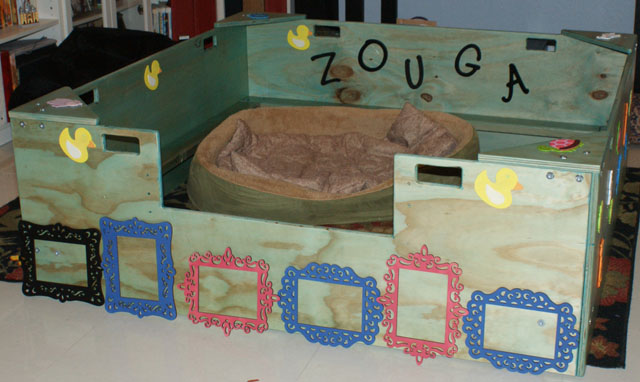
We used your plan to make our girl Zena a whelping box. We had a lot of fun decorating it as a family. Can't wait for the new puppies to get here and use it.
cdduclos


2015-04-18
Thank you so much for the plans on Whelping boxes. Our German Shepherd just had her litter on April 16th.
Thank you
Misty
From Ohio

2015-01-21
Hi,
I built this whelping box on instructions from friends according to your design. The dimensions are 1500mm (L) X 1200mm (W) X 500mm (H). The material is white melamine over chipboard and can be dismantled completely. The pig rails are 120mm from the floor and 150mmwide
The puppies are due around the 14th of February.
Kind regards,
Kobus Steyn
South Africa

2014-08-25
Hi Kent,
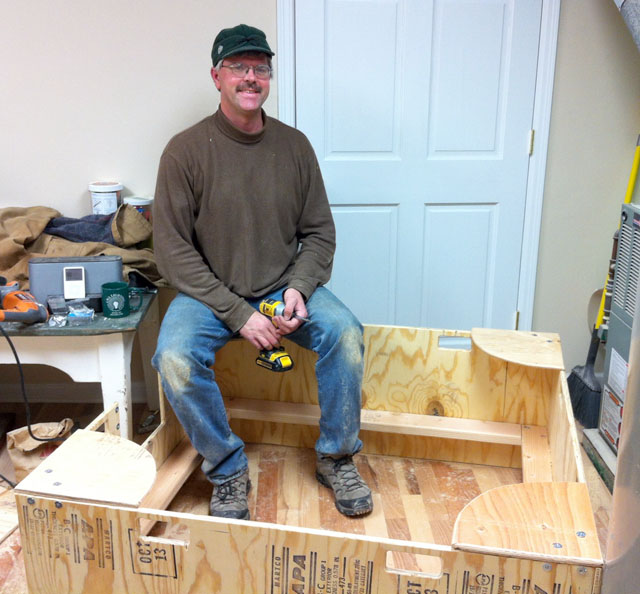
We have a Dobe getting ready to have pups. My wife was researching whelping boxes and came up with yours on line. You asked to send along any Pics which I attached one and any suggestions. So.. My thought process before starting this project was how can I minimize the time and cost to build this off your plans so here's what I did different.
Materials include:
1x 4'x8'x 3/4" BC ply
1x 2x2x8
4x 1" x 4" x 6' pine boards
1 Qrt. water base non-odor clear sealer and cheap 3" brush
Woodscrews
2x Hinges
1x slide bolt
This box is 4' x 4' with 4" pig rails, 20" high. Hardware includes wood screws and two hinges. I simplified the construction process a bit. I purchased one 3/4" sheet of BC plywood and had Home Depot cut four pieces 48" x 20" for me while I shopped and so I didn't have to pull my table saw out. (**I realized after building it I would have spent the extra $12.00 to buy a 3/4" sheet of Birch Veneer which would have minimized my finish sanding time but that's ok)
I reduced the number of grab handles to one each panel centered and two on front. I centered those 1" down and used the oval handle on my level to trace the handle on each box side. I used a 1" paddle bit to drill 3/4's of the way thru each end of each traced handle then flipped to drill the rest to prevent break out chipping from the bit. I used a sabre saw to cut the remaining lines to each drill hole to form the handle.
I cut out the door 10" down from the top x 18" wide.
All I needed is one seat to square the box after assembled. I cut out the one corner seat from the remaining piece of BC ply and reversed the oval which takes up less air space inside the box. I used a string and pencil to create the oval (arch) and used the sabre to cut it out.
I cut four 13 1/4" pieces from the 2x2x8.
I do have a router so I rounded over all the edges and handle slots on each side panel quickly, the 2x2's and the door.. I used my palm sander and finish sanded everything quickly with 150 grit.
I cut the pig rails to fit, rounded edges and sanded. Two x 48" long and the other two x 41" long. From there I sealed everything with one coat of the fast drying sealer.
Assembly was quick. I mounted the four 2x2's to each corner of two panels with three 2" wood screws each, pre-drilled and counter sunk. Then I mounted the two longer pig rails right under the 2x2's
with 5 screws each. I attached the other two panels the same way, 3 screws each and attached the shorter pig rails with four screws each. I attached the seat and squared the box. Then I drilled and counter sank four angle holes into each corner of the pig rails to secure them together. I attached the door but I made the door swing in instead and locks with a slide bolt. Reason for door to swing in was so it didn't impose an exterior obstacle to access the box.
Storage; Remove 16 screws and seat then store
Material costs about $80.00
Time spent to build about 4 hours completed
Please feel free to use any of my alterations and thanks for the use of your plans as well...
Sincerely,
Duane Coleman
Realtor/ Property Manager/ Owner/ SFR
San Tan Mountain Realty And Property Management
Queen Creek, AZ
www.OurArizonaHome.com


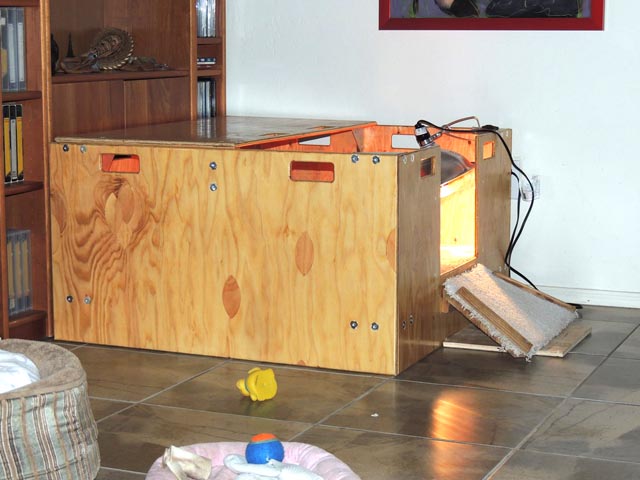
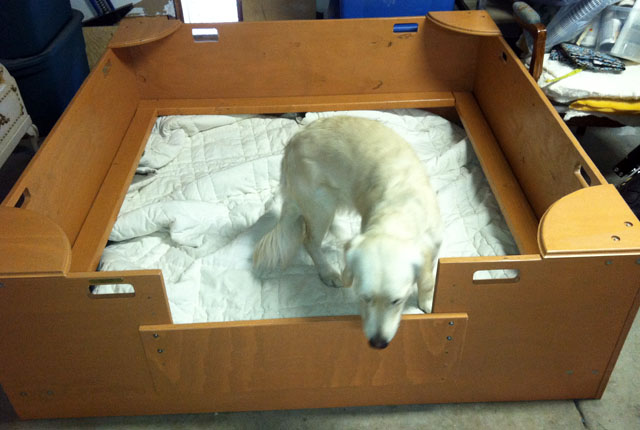
2014-08-09
Our kennel, Kramer's Cottages Labrador Retrievers, is in Fort Worth, Texas. Thank you for posting the plans for your McEmn Mark III whelping box! The design is very functional and efficient, and adaptable for many applications.
I used your design, as published, with a few modifications: 1) substituted threaded inserts (E-Z LOK part number 801024-13, available on the McMaster-Carr web site) for the T-Nuts to minimize any visible surface hardware, and 2) added on a 5'x4' weaning pen with a slide-in removable access panel that goes down to the pig rail on the rear wall of the whelping box. Our intent is to have potty-trained pups by the time each of them departs for his or her permanent home.
Our Black Lab, Cinder Ella, is due to deliver within a few days and is getting acclimated to her two-room birthing condo.
I'll send an update once the pups deliver and are playing in their whelping/weaning box!
Regards,
Russ & Chrissy Kramer


2014-05-31
Finished and ready for many pups to come. Thanks for the great plans. I went by them basically as written other than the door opening. Made it adjustable to 3 heights and adjustment can be done in seconds without tools using washers & steel spacers. Attached are some pics for you. Thanks again.
outdoorzdad


2014-03-22
Here are a couple pictures of my upper mid content (F7) American Wolfdog, Lori in her beautiful new whelping box.
I have not bred a litter of puppies in 18 years and am so grateful to you for sharing your wonderful plans.
I am not really sure what modifications my husband did to your plan. I know the curved bench seat was too difficult so he shaped that a little differently. We made ours 4 x 5 feet with 2 foot sides. There are 2 tops that don't attach at this time, while we are figuring out if she wants a den or a box. The one pictured is the smaller one.
We sanded and sanded until everything was smooth and then I used a light gray wood stain to make it match our walls.
I DO plan to decorate it, but probably won't do that until we disassemble it to store for future use...but I did buy colorful paints for the job! I will send another picture when I actually do it.
Today is the first day she has actually laid in it (she is due today!) Daddy Klaus thought the box was for him. The door being up doesn't keep her IN but does keep him OUT so she can have some peace.
---------------
2014-03-25
She had them they day after I sent you the pictures of the box we built using your plans. I have shared it all over Facebook and just shared a link in the Dog Breeding and Whelping Group. :) Thanks again!
LaLainya
Coddled Critters. Pet-Sitting, Pet Photography & MORE
www.coddledcritters.com / https://www.facebook.com/WeCoddleCritters

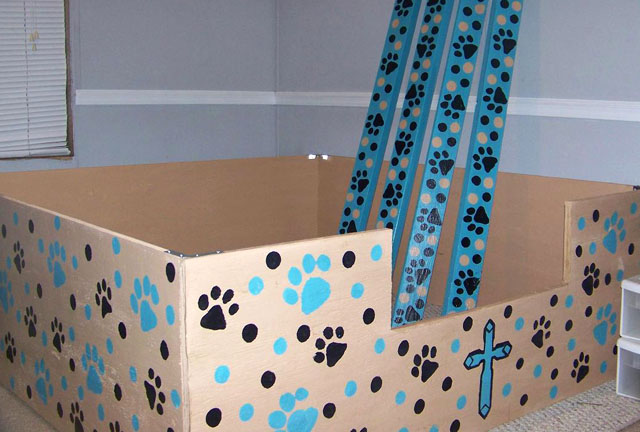
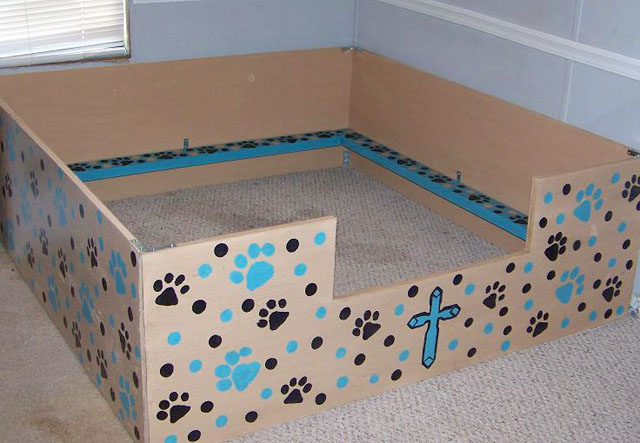
2014-03-15
Our Great Dane took to your whelping box design perfectly. It's the perfect size for her and me. Adding some safe paint and design made it even better.

2014-02-23
Thanks so much for the whelping box plans on your site. I used them to construct a box for our golden retriever who's due in a couple of weeks. I went with 4' per side, and cut the pig rails at a 45 degree angle rather than rabbit the joints, but we're very pleased with the end product.
Thanks,
Dylan


2014-02-11
Thank you very much for such detailed plans for a whelping box. I built and fly my own plane and I know the importance of a good set of plans along with a complete bill of materials. Your plans meet all the standards. I really appreciated the instructions for the router guide for cutting out the hand-holds. I had never cut hand-holds before and, with your guide, it was a pleasure and a snap. The corner brackets are a bit pricey, but they make for an extremely rigid build even without an attached floor. I particularly appreciate the aspect of "designed-for-disassembly". After all, who wants a whelping box sitting around after its use is complete. Storage of the panels is neat and easy.
Advice to new builders from a first time builder. If you don't own a Forstner bit, get one. Don't mess around with a spade bit. The Forstner does the job right. Buy a good router. It will make the difference in the quality of your build.
Modifications to the plans. We have Lhasa Apsos (traditional guard-dogs for Buddhist monasteries in Nepal), and a whelping box for Great Danes was a bit oversized. I reduced the external dimensions to 3' x 3' x 19.5", and reduced the thickness of the plywood to 0.451" (must be the new standard for 1/2"??). Even with the reduced thickness of the plywood, the structure was strong and firm. I added a carpeted ramp to facilitate the dam's entry into the whelping box. In addition, I added a strip of carpeting on the pig rail at the entry point. The dam was slipping on the bare, polyurethane coating. After whelping, a towel was secured over the door with clothes pins to act as a barrier to drafts. The dam had no trouble passing through the towel flap since it functioned like her dog door.
I extended the design to include an attached 3' by 4' weaning box. The access door to the weaning box is modified with aluminum channel extrusions to allow doors of different heights to be slid into place. The extrusions are available at Home Depot. The weaning box, of course, does not have pig rails. The end panel of the weaning box serves a dual purpose as a heat-conserving roof on the whelping box until the pups are ready for entering the weaning box. The temporary roof is secured using the corner brackets from the weaning box. The temporary roof serves as a perfect spot for the "Ready Box" during the whelping process.
This was the first litter for our dam and our first litter ever. There were only two pups -- a very healthy female (named Nema) and, sadly, a male with a cleft pallet. The male pup wasted away over four days being unable to nurse. Maybe things will be more successful the next time around.
You may post this, if you see fit. Thanks again for your detailed, successful design
Marc Borom
Tucson, AZ
http://marc-borom.com
-----
4/12/2017 Update:
Thanks for posting my remarks. We certainly enjoyed the use of your design. Our pack of 8 puppies has been dispersed and we are happy with our reduced pack of four. The remaining pack, including sire and dam have been neutered. Our whelping days are over.
Our box is available for purchase at materials cost, if you have any requests.
You have provided a great service.
Marc Borom
borommarc@earthlink.net


2014-01-01
Hi - I wanted to pass along photos of the whelping box we just finished constructing, using your plans. I downsized it to a 4' by 4' box because it's for an English Springer Spaniel (Millie).
I started it yesterday afternoon and finished it this evening with the help of my 3 sons. The only thing left is putting polyurethane on it. Millie is due January 17th, so it was nice to be able to put something together relatively quickly.
I really like your design. It looks really nice, is relatively light weight, and your instructions were pretty easy to follow. The seats in the corners are a really nice touch. I'm not very well versed with carpentry so this was a real learning experience for me. Gave me a great excuse to purchase a router ... and gave me some great experience in using the router.
Thank you so much. We feel much more prepared for the whelp now. Hopefully this will be used for many litters in the future! We'll send you some more photos with Millie and her pups in a couple of weeks.
Jeff and Karen Ebsch

2013-10-22
I used your plans to build my whelping box for my German Shorthaired Pointer. I've helped whelp several litters, and your design is the best. Love the fact that you can store it for future use. I painted mine yellow and green, cause I'm a huge Oregon Ducks Fan. I found some redwood 2X4's and used them instead of painting them. They are super smooth. I also made the corner seats and door (not in picture) out of the same wood. Love it
Thanks for supplying such a detailed plan for whelping boxes.
Darlene (DeeDee) Pope
Livermore, Ca.


2013-09-28
I got the design for a whelping box off the internet and after picking up a sheet of 5/8" plywood and two 2x4's I proceeded to build my (smaller) version. Struggling with my disabilities but managed a fair representation. At this point I still need to sand the edges and then convince Konteika (my German Shepherd) that she needs to check it out. Puppies aren't due for another 3 weeks but I wanted to be ready."
I wanted to make it with as little hardware as I could manage so ended up using a halved joint on the boards. Kept the boards 2 feet high as with previous litters the pups learned to climb very well. I don't have a router so passed on the handles (for now). Made the opening as a half circle and put wood trim at the top and bottom (inside and out) to secure it in place for when the pups are older.
Thanks so much for the plans....they helped immensely.
Pat
To see the ARTwork of Pat Kirkwood Halverson go to:
https://sites.google.com/site/patkirkwoodhalversonart/Home

2013-09-24
We just constructed a welping box from your plans online. Thanks for posting them, very simple easy to follow design!
Carol
orchardhillkennels.blogspot.com

2013-07-17
We wanted to show you our whelping box based on your fabulous plans - thanks so much! Everyone is in awe of the whelping box!! Our clever friends Doug and Marcos did an alteration and made slits in each corner to slide the pieces together, making it easy to take apart and move without the hinges. We stained it with non-toxic stain. Hannah, the Bernese Mountain Dog now has nine puppies and the box is perfect for the brood. I've written two children's books about this dog "A Snow Day For Hannah" and "A Beach Day For Hannah." The next book will be about these puppies, and so look for a whelping box shot in there! http://www.mountaindogbooks.com There are also some photos on Facebook at https://www.facebook.com/HannahTheMountainDog. Thanks for sharing your design - it is wonderful!
Thanks,
Linda Petrie Bunch
Core Interactive Media &
Book Club Productions
1024 Cherokee Street
Suite 275
Denver, Colorado 80204
303-517-2165
lpetrie@coreinteractive.com
Please visit us at
http://www.CoreInteractive.com &
http://www.MountainDogBooks.com

2013-06-07
Here are 2 photos of our new whelping box for our Labrador Zoey. Almost done, just need some finishing touches, seats and rabbeting the 2 X 4's for the pig rail. This is actually my second one I have made using your construction plans, first one got left out in the elements and is ruined, but this one came out much better. Modified your dimensions for a 48" X 48" box. Tip for those out there looking for an alternative bottom; I went to Petco and purchased a new replacement crate tray 47" X 29", fits perfectly in our 48 X 48. This will mainly be for when the puppies are big enough that we put the divider in to separate pee & poop area from the food and water area. Also, if you will be super easy to clean as you can take it out and spray off with hose if needed! Hope is useful.
Thanks again for a great plan,
Lance Burkholder
Mount Pleasant, Pa

2013-05-18
Thank you for the plans. I added some adjustable height infra-red lamps to keep the puppies warm. It's a four foot square design, which was the perfect size.
The box worked very well, and the seven Golden Retriever puppies all now have lovely homes. We kept one!
Best Regards, Anthony
Near Canterbury, Kent, England.


2012-12-09
This is our whelping box design based on your plans, exellent information off to paint the box now!
Ruff Knight Dobermans
Ontario, Canada

2012-12-07
Thank you for easy to follow instructions and a great design.
Regards,
Olli Rita
Winter Fell Rottweilers
+1-561-329-9235
rinvest@comcast.net

2013-11-08
From hanabebe001@yahoo.com


2012-10-03
Thank you for your whelping box plans. I don't know what I would have done without this box! The total cost came to around $100.00 for the materials from Home Depot 9/13/12. (The non-toxic shellac wasn't cheap, but we like non-toxic).
2013-07-29 (update)
Here's a photo showing how we later modified it so the puppies could have their own access to the paper training area and the mother had her own door (original) so she didn't have to come and go through the puppy poop. A slat was slid in to keep the pups in one area while the other was being cleaned. This made things much easier! Thanks again.


2012-04-28
Greetings!
Thank you fir the fantastic and innovative plans you put out on the net. I am in Lusaka-Zambia and as a hobby I breed Boerboels. My bitch lost the most puppies in her third litter (x4) and it is always due to laying on them. I have no way of controlling mating so she always has the max number of pups for her frame - nine!
At 60kgs she easily suffocates her pups and it is heart breaking to find dead pups. This got me desperately looking for a solution and I stumbled across your site. With some modifications along the way your material guide was excellent. I reduced the size to my use and I didn't find the 3-way corner bracket but I improvised by wielding a triangle plate to the available 2-way "L" shaped brackets.
I used a single sheet of pine 12mm plywood and pine 2x4 plank for the pig rails. The result is an amazing professional looking whelping box. I can not believe I made this. Savanna loves it and so do her remaining five pups which love the spaces under the pig rails. I didn't even need to use any vanish!
My only regret is that I wish I had known about this solution much earlier, I would have saved the lives of x4 pups (and had a fatter bank account-lol)
Thank you
Brian

2012-04-15
As you can tell from the picture the puppies didn't wait for us to get the rails and the seats stained!!! Awesome plans from you, and the hardware was delivered from the site you recommend in two days! We bought two mats off of amazon.com and have been changing them out. Next we will be using the box for our American Bulldogs!
Thanks
The Coggins Family
Grimesland, NC

2012-01-03
I just want to say thank you for putting your whelping box plans on the internet for others to use. I built one for our Shiloh Shepherd "Teeka" and she seems to be very happy with it. Now we have to wait about 2 weeks to add the puppies!
Thanks again
Tom Sullivan
Petrolia, On. Canada


2011-12-11
Greetings from Texas. Just wanted to thank you for the whelping box plans. I've done German Shepherd breeding for 10 years using everything from a small bathroom lined with blankets, to commercial whelping boxes. None seemed to do well (bathroom floors are cold if blankets are nested by the mother) and the commercial whelping boxes never seemed to hold up to much use. Now that my wife wanted to breed Rottweilers, I decided to used your plans as a babsis for our new whelping box for Raven, our Rottweiler. As Raven is used to being in contained in a kennel indoors at night, we had to have a whelping box with a top so it could double as her kennel.
The whelping box is 48L x 48W x 30H. The sides are 5/16" MDF wall panel with a Hickory stain and polyurethane top coat. Everything is held together with 1/2 pound of 1.5" stainless steel lath screws (the type of screws with a built-in washer on the head). Bracing is 1 x 2 lumber.
The lid is 1/2" Ash plywood with a clear-coat polyurethane varnish on the inside and Hickory stain on the outside. The lid has 2 x 4 cross bracing for support and has a cut out for a 2 x 4 support to keep the top open for ease in cleaning. The lid support itself is a simple notched 2 x 4 which is through bolted and counter sunk to the top horizontal brace using a 5" stainless steel bolt and washers for the hinge. The lid hinge is a 30" brass piano hinge.
The floor is also 1/2" Ash plywood and all inside areas of the box were left natural but given 2 coats of polyurethane varnish. The bottom was then covered with commercial grade vinyl flooring (a remnant from a hardware superstore), caulked on all sides to prevent liquids from seeping underneath. It's topped with a Drymate Whelping Box Pad and we use puppy training pads during birth for extra absorption.
A sliding door panel (see photo) is cut short for ventilation (Raven can stick her muzzle out between the lid and the top of the door panel). The door keeps Raven in the box at night instead of using her usual transport kennel.
The Pig Rails are 1.5" PVC Schedule 40 pipe, capped and friction fit into the box. Friction fit pig rails makes cleaning easier but still allow safety for the pups as the rails bump up against the 1 x 2 bracing giving a total of 3.5" of clearance between the sidewall and mom.
Now for the more "high tech" (read: we spoil our dogs) features: Temperature is monitored with an Acurite Indoor/Outdoor Thermometer with Remote display and hig/low temp alarms. The probe is mounted behind one of the Pig Rails at puppy height.
Heat is provided by an Optimus thermostatically controlled small room space heater/vent fan which keeps the whelping box at a constant 70° to 80°. The heater is mounted high through the wall, much like you would do with an A/C window unit. This was the most challenging cut because of the odd shape. However, because it is mounted through the wall at the top of the box, there are no exposed cords for Raven or the pups to chew on and no one can lay against the heater. With this set up, there's no need for heating lamps or heating pads. We do have an emergency heating pad just in case.
Two 2' battery powered (4 "AA" batteries each) flousrcent lights have been installed inside the lid. These lights are available in the camping section of Wal-Mart or other big box outdoor stores and can be screwed in or attached with Velcro.
As you can see from the photo, we have also installed foam pipe insulation on the doorway, door panel and front of the lid so Raven doesn't scrape her head or belly on the wood when she enters/exits the Whelping box. Other features include a screw in hook on the outside of the box to hold a clipboard for the litter record, a yellow triangle "Rottweiler Crossing" warning sign (at my wife's insistance), a sling-type puppy scale (not pictured) and emergency first aid kit (forceps, scisors, gloves, PVP Iodine wipes, umbilcal clamps, dental floss, dog anal thermometer, disposable bags, infant suction bulb, etc.).
The total cost for building the box was approximately $200.00 and includes everything listed above including the whelping pad, thermometer, lights and heater. Because of the drying time for the varnish, it took about 4 full days to put together. The complete box weighs about 40 to 50 pounds and can be brought inside easily by two people.
Raven's litter is expected today or tomorrow (12-11-11 or 12-12-11). Since she is predicted to have a large litter, we wanted to take a chance while we had it to again THANK YOU for the plans that helped us create what we see as the "perfect" whelping box for our circumstance.
Christopher and Pamela Bayhi
www.lakesiderotties.com
sales@lakesiderotties.com
2011-11-22
Just wanted to let you know your whelping box plans were just right.
The directions were easy to follow and the small suggestions offered during the construction were welcomed.
Thank you for providing the plans...hopefully we will have some English Cream Golden Retriever puppies to fill the box in a few weeks. :-)
Frank Davie
Pine Valley, Utah


2011-08-04
Thank you so much for the awesome whelping box plans! I used them (with a few minor tweaks) to build a 5'x5' box for my American Bulldog, Delilah.
I decided to put in a double door rather than the adjustable to make it easier to get in and out quickly. Also, I opted to build the box 24" tall because my last litter was constantly scaling the walls once they were strong enough. I lined the bottom of the box with a sheet of linoleum and ran it up the walls to the base of the pig rails. It makes for a great liner and easy clean up! I cut out (2) 5'x5' sheets of carpet as I like to put those in the bottom and change them out for easy clean up as well! I used these cleaning "methods" in previous litters and when we used to breed Australian Shepherds.
Delilah had 7 puppies on August 3, 2011 and they are all very much enjoying their new whelping box. I included photos of the whelping box as well as Delilah, Axle (the father), and the new puppies!
Thank you again for the terrific design!
Brittany Behringer
BMB Bulldogs
www.wix.com/CAcowgirl02/BMB-Bulldogs

2011-07-19
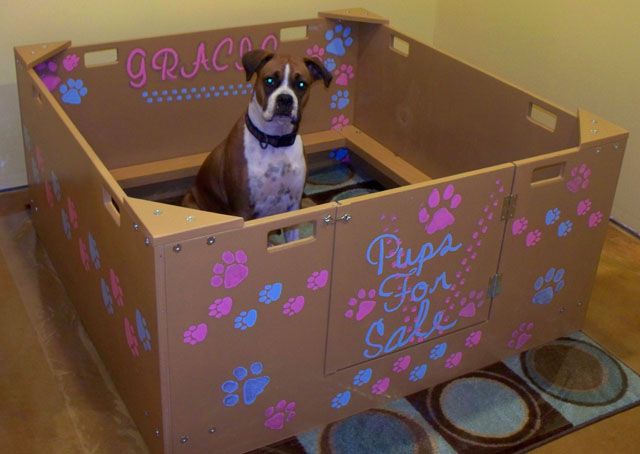
I just finished a whelping box for our boxer Gracie. She loves it. Thanks so much for publishing the plans. It is a great whelping box!
Trey


2011-05-21
We built your Mark III whelping box this weekend. We went a bit bigger for our Leonbergers - 6' x 5'3" x 2'. We couldn't find the metal brackets so we built wooden brackets and they are working very well. We also added a side access panel to let the pups walk out and begin potty training early and decided to go with an amber shellac for the stain. We are thrilled. Thank you so much for sharing this with the community! Our Brubeck thinks the new digs are pretty nice, too!
Matt and Susan Townsend
Sforzando Leonbergers
www.ncleos.com


2011-03-18
Please add us to your page, Thank you so very much.
St. Peters, MO
2011-02-23
I just wanted to send pictures of my whelping box that I made using your plans. The whelping box is a 5x5 - 20 inches tall with a few modifications and made with 3/4 inch treated plywood. And was built for a Great Dane.

2011-01-27
Hello and thanks for your ideas on whelping boxes. It helped tremendously.
My husband and I built one along the same design. We did put a floor in it though. We built it 5'x5' and made it where it could be taken down and stored if necessary. We put pig rails made from 2x4. We also put linoleom in the bottom and also on each side.
I am now using it for the female's get-away...lol...from her pups. I put her a blanket and she just loves it. I also use it to feed the pups in while I am cleaning the floor from their little mishaps. I have just about enough time to get this job accomplished before the pups are ready to climb out.
The outside of the box was stained so it looked a little better. I also stained the pig rails for easier clean up. I am planning on cutting a Great Dane plaque out to put on the front. This was a super idea for a very large dog. Clean up is wonderful and less time. THANKS
Denna

2010-05-21
Thanks again for taking the time to post the plans on how to build a whelping box! I made a few modifications: used 1/2" plywood and reinforced the corners, made a fold down access panel as opposed to adjustable and in the spirit of take-a-part-ability added a removeable floor. I covered 3/8" plywood with vinyl flooring and placed strapping underneath every 8" to give the floor some give. The box sits on top of the floor which is cut 1" wider all around than the box. The box is held in place on the floor by a frame of 1" nailing strips all around the perimeter of the box. It makes for easy cleaning and the box is just lifted off, reducing weight. This is our first litter so we wanted to be prepared. Your website helped greatly! We had 6 puppies - 4 males, 2 females - all brindle.
Thanks again!
Nikki & Sharon King
Kingstone Reg'd Great Danes
Sound Minds, Sound Bodies
Beiseker, Alberta
http://kingstonegreatdanes.com

2010-05-17
I just wanted to say thank you for posting your whelping box design. My Mastiff Lily really likes it. We are now prepared for what lies ahead.
Thanks
Jolene
2010-05-03
Greetings from San Jose, Costa Rica. Many thanks for posting your whelping box plans. I looked at several designs and yours are the best I've seen.
I particularly appreciated your detailed instructions and explanations. Using them, I built my whelping box over a single weekend. With minor changes, it took me about 12 hours of actual construction time including finishing with two coats of water-based 3-in-1 polyurethane sealer-stain-varnish.
I made the following changes, based on my needs, tools and budget:
1. I made my box 4' x 5' with 18" high sides. This is a generous size for my golden retriever and the 18" sides are plenty high enough for her pups. Doing so allowed all four side panels to be pre-cut at the building supply store from single sheet of 1/2" plywood.
2. This left me with a 1'x5' remainder which I used to make the removable access panel and two triangular seats. I cut two more triangular seats from the scrap cut out from the access panel. Instead of using tee nuts, I screwed all four seats to the corner braces from below with the wood screws that came packaged with the braces. This was faster and gave me a neater finish.
3. I made my pig rails from 1x4's with mitered corners, instead of the rabbited joints you used. I then took four of the triangular end scraps and screwed them to the corner braces from below, using the wood screws that came packaged with the corner braces. I attached the pig rails to the triangular pieces from above with 1 1/2 inch wood screws which I was able to recess into the rails by simply tightening them without boring countersink holes. This made for a very fast, neat installation which was plenty sturdy enough for the intended use.
4. Instead of 4" corner braces, I used 3" corner braces under the seats and 2" corner braces under the pig rails. Again, they were plenty sturdy enough and less expensive. However, if I had it to do over again I'd use 3" braces under the pig rails as well simply because there's more clearance for tightening the bolts and screws.
5. I used 1/4x20 tee nuts and standard zinc-plated hex head bolts. These are inexpensive and readily available in any hardware store, even here in Costa Rica, and can be tightened with a simple end wrench or a socket and ratcheting nut driver. I found it much easier to fully press the tee nuts into the plywood before assembly. Since I didn't have a drill press, I used an ordinary c-clamp which works fine.
6. With the plywood pre-cut at the building supply store, I found that I didn't really need a table saw or a router and made all remaining cuts with a power miter saw (not necessary but faster and neater) and with a saber saw which I used for cutting the access panel and hand holes.
7. I used a 1/4 sheet finish sander to smooth my cuts, round the edges and prepare the plywood for finishing, followed up with hand sanding the hand holes and all of the rounded edges.
The project turned out great. The pups were born last week and the box is working out fine. I'll send photos soon. Thanks again
Jim


Hey there,
Love the design, built ours this weekend... only a 4x4 though for our lab. :)
Here are some photos for your site .. after the pups are here I'll probably write up a little something about my experience of building the box for my site www.fourpaw.com.
Mike


I cannot thank you enough for posting this Construction on the Internet. I have attached some pictures as requested and boy, was it easy.
I chose to use 3/8" plywood (sanded) to help with weight reduction. I also used some of the leftover plywood instead of 2x4's for the "puppy rail". Home Depot cut the plywood for me (20" x 60") at no additional cost. I bought a remnant of carpet (6x6) for $20 & cut it myself to 5x5. I bought all the hardware at a local Fastenal Co. I also "borrowed" the Dane Engraving idea from one of your past builders. All in all, I have less than $100.00 in the construction. I used Minwax "GunStock" stain and put three coats of Minwax Waterbased "PolyCrylic" clear coat.
Anabelle Blue is expecting 10 - 11 puppies the 1st week in March 2010. She already LOVES her new box.
Thank you so much,


2010-01-27 Oak Whelping Box
Thank You so much for your whelping box plan, it was so easy to follow and the hardware is perfect.
I made mine out of Oak 3/4 plywood and put three coats of gloss polyurethane on it.
It turned out great, everybody that has seen it so far asked me where did you buy that because it looks so great.
I did downsize mine down to 4x4 and
used only one sheet of plywood, which did leave me with two less seats.
I will make them soon out of just a solid oak board.
Sincere Thanks,
Kevin
www.bigmuddycreeklabs.com


2010-01-24 Three pictures for you from Hawaii
Mahalo for all your help with our whelping box. I have standard poodles and
we opted to make our whelping box
4 x 4. We lowered the pig rails.
Although our home floors are concrete, I opted to use my husband's weight
lifting floor mat and a piece of scrap linoleum from Home Depot for the
flooring of the box.
We still have one more step and that is to finish it with a non-toxic
varnish.
Mahalo nui loa.
Lehua

2009-12-23 McEmn Mark III Whelping Box
I just wanted to say thank you for your whelping box design. Toffee and I appreciate it. The plans are accurate and very well thought out.
Your hardware selection was perfect for a "knock down" whelping box.
I choose to build mine 4' x 4' utilizing only 1 sheet of 3/4" AC plywood (Labrador Retrievers don't need a 5' x 5' box).
As you can see, it turned out really nice. I ordered the 3/4" SS screws to accomodate the increased plywood thickness.


2008-01-11
I found your site and loved the plans for the whelping box.
I didn't need one quite so large, as we breed medium size American Staffordshire Terriers. I took the plans and made them fit a 4' x 4' box for our needs.
I had to adjust the pig rail height and the length of all the sides. It worked well and the seats really do not interfere with the handles. We only used handles on the front and back as we will not need to disassemble it often, just move it here to there.
We used cabinet grade plywood and gave it two coats of satin polyurethane. I loved the way it came out and decided to say thank you and send you some pictures. Let me know what you think!
Al
www.retrostaffs.com


2008-05-05
Good Morning,
My husband recently built a whelping box per your design. He surprised me by having the name of our kennel routered into it. We named the kennel after my dad – so it is a very sentimental name.
I hope you enjoy the photos and feel free to use them on your web site if you’d like. Our dogs are Wirehaired Pointing Griffons and we expect our first litter this coming weekend.
Mary
Harborfront Interiors

2007-10-10
Alan modified the design to have channels that accomodate drop-in slats rather than a screwed-on access panel.

2006-11-26
Colleen sent us several photos of the whelping box they built from hardwood plywood for their Samantha X Travis litter.